
How to charge an RV air conditioner safely and easily is essential for keeping your RV cool. Your AC keeps the inside fresh and comfortable. Sometimes, it may stop cooling well. Low refrigerant, also called Freon, is a common reason.
Charging an RV AC means adding refrigerant, a special gas that cools the air. Without enough, your AC won’t work properly. This guide shows you how to charge your RV AC correctly and safely.
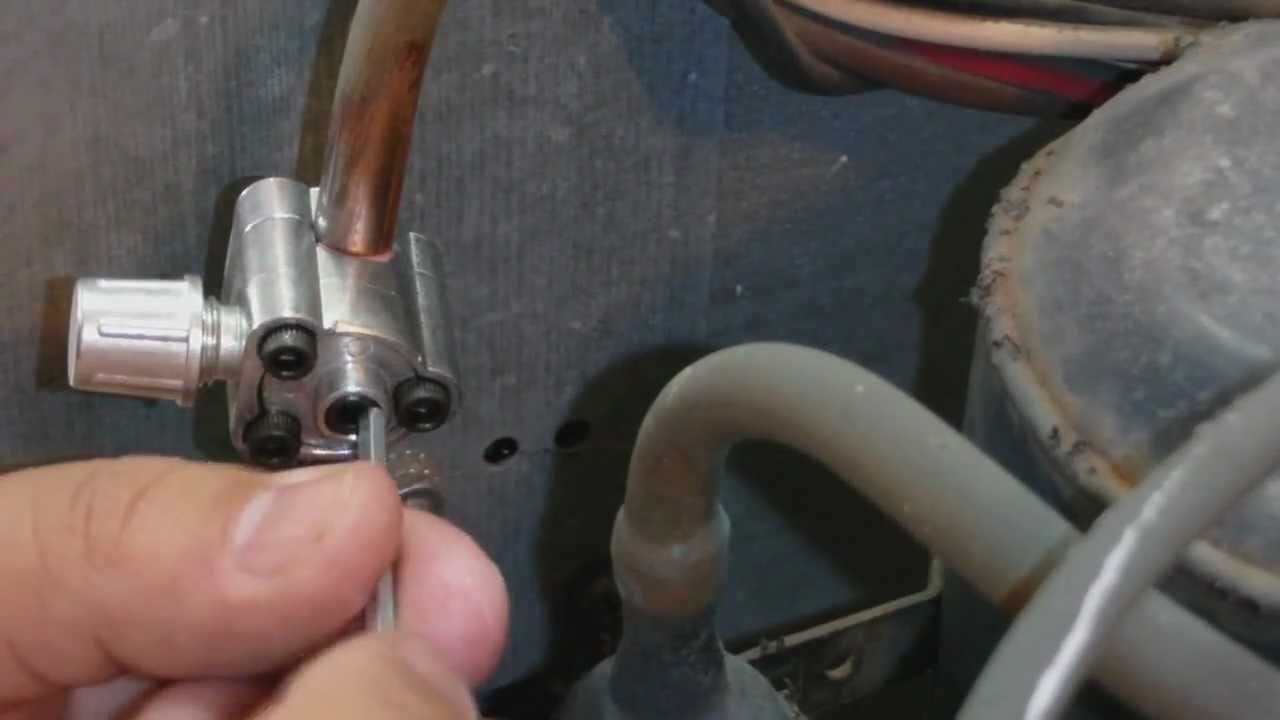
Credit: www.youtube.com
Why Charge Your RV Air Conditioner?
Your RV AC uses refrigerant to cool the air. Over time, tiny leaks can let some escape. This lowers cooling power.
When this happens, the RV can get hot, even if the AC is on. Charging the AC adds more refrigerant and restores cooling.
Be careful, though. Too much or too little refrigerant can damage the system. It’s important to follow the correct steps.
What You Need to Charge Your RV AC
Before you start, gather these tools and supplies:
Refrigerant (R-22 or R-410A)—check your AC model for the right type.
Manifold Gauge Set – to measure pressure in the AC system.
Vacuum Pump – removes air and moisture from the system.
Refrigerant Charging Hose – connects the refrigerant can to the AC.
Safety Glasses and Gloves—protect yourself.
Thermometer—checks temperatures before and after charging.
Never try to charge your AC without these tools. It can be dangerous.
Step-by-Step Guide to Charge Your RV AC
Follow these steps carefully. Take your time and stay safe.
Step 1: Turn Off the RV AC
Switch off the AC and unplug the RV. This prevents electrical accidents.
Step 2: Locate the Service Ports
Find the low-pressure and high-pressure ports on your AC. The low-pressure port is usually larger.
Step 3: Connect the Manifold Gauges
- Attach the blue hose to the low-pressure port.
- Attach the red hose to the high-pressure port.
- The middle hose connects to the refrigerant can.
Step 4: Check Current Pressure
Turn on the AC for a few minutes. Read the pressure on the gauges. Compare it to the recommended pressure in your AC manual.
Step 5: Remove Air and Moisture
Turn off the AC and connect the vacuum pump to the low-pressure port. Run it for about 30 minutes. This clears air and moisture from the system.
Step 6: Add Refrigerant
Attach the refrigerant can to the middle hose. Open the valve slowly to add refrigerant. Watch the gauges and stop when pressure reaches the recommended level.
Step 7: Check the Temperature
Turn the AC back on. Use a thermometer to see if it’s cooling well. If it still feels warm, you may need a bit more refrigerant.
Step 8: Disconnect the Equipment
Turn off the AC. Close all valves and disconnect hoses. Replace the port caps to prevent leaks.
Step 9: Test the AC
Turn the AC on again for 10–15 minutes. Make sure it cools the RV properly.
Important Safety Tips
Always wear safety glasses and gloves.
Work in a well-ventilated area.
Use the correct type of refrigerant.
Never release refrigerant into the air.
Ask a professional if you are unsure.
Signs You Need to Charge Your RV AC
Look out for these signs:
The AC is not cooling well.
Ice forms on the AC coils.
The AC runs longer but doesn’t cool.
Hissing or bubbling noises near the AC.
Higher electricity bills than usual.
Low refrigerant is often the cause when these appear.
Credit: dakotalithium.com
How Often Should You Charge Your RV Air Conditioner?
Most RV ACs don’t need frequent charging. If there are no leaks, refrigerant lasts for years. If your AC loses refrigerant often, you probably have a leak. Fix the leak before charging again. Regular maintenance keeps your AC running well. Check it every year to avoid problems.
Common Mistakes To Avoid When Charging Your RV AC
Charging an RV air conditioner seems simple, but mistakes can happen. Avoid these errors:
| Mistake | Why It Is Bad | How To Avoid |
|---|---|---|
| Using wrong refrigerant | Can damage the AC system | Check the AC manual before buying |
| Overcharging refrigerant | Leads to poor cooling and system damage | Use gauges and stop at correct pressure |
| Not removing air and moisture | Reduces cooling and causes corrosion | Use a vacuum pump before charging |
| Not wearing safety gear | Risk of injury from refrigerant | Always wear gloves and glasses |
When To Call A Professional
Charging your RV air conditioner is doable if you follow steps. But sometimes, it is better to ask for help. Call a professional if:
- You do not have the right tools.
- You find leaks you cannot fix.
- The AC still does not cool after charging.
- You feel unsafe working with refrigerant.
Professionals have the right equipment and experience. They can fix leaks and charge the system safely. This can save you time and money in the long run.
FAQs about How To Charge An Rv Air Conditioner
How Do I Know When My RV AC Needs Charging?
Check if the AC cools poorly or runs longer than usual.
What Type of Refrigerant Does an RV AC Use?
Most RV AC units use R-22 or R-410A refrigerant types.
Can I Charge My RV AC Myself Safely?
Yes, with proper tools and instructions, DIY charging is possible.
How Much Refrigerant Does an RV AC Require?
Typically between 2 and 4 pounds, but check your unit’s specs.
Conclusion
Charging your RV AC keeps you cool in hot weather. You need the right tools, safety, and care. Always check your AC manual for refrigerant type and pressure. Use a vacuum pump to remove air and moisture first.
Follow each step carefully. Avoid mistakes to protect your AC. If unsure, call a professional.
With proper maintenance, your RV will stay comfortable on every trip. A well-charged AC means happy, cool travels.